Monday, March 24, 2014

DIY: Terrarium


Terrariums are a great way to capture some greenery in the home without the mess of a pot plant, and are a really low maintenance way of keeping a 'garden'. My girlfriend and I got together for a craft date yesterday and got our hands (sorta) dirty making some terrariums. 


To Make a Terrarium You will Need:

  • A container or vessel to hold your plant
  • Gloves (potting mix and charcoal are a bit yuck)
  • Potting Mix (see tips below for more info)
  • Activated Charcoal
  • Gravel
  • Sphagnum Moss
  • Plants of your choosing (and some decretive statues if you like)


Tips, Tricks and To-Do's (and don'ts)


Selecting Your Terrarium

To make a terrarium you need a container. You can plant your terrarium in virtually any container you like (google terrariums for inspiration), however you will have to keep your plant choice in mind when selecting your vessel. If you choose something with little ventilation, like my laboratory bottle above, you will need plants that are tolerant of high humidity such as ferns and mosses. 

Plant Selection 

If you would like to grow cacti and succulent you will  need a vessel with a greater air flow, cause cacti live in dry arid places, not in wet humid forests. If you do want to do cacti and succulents in a closed vessel, you can do what my friend did and use one with a opening 'door' so you can open your closed space and give you plants room to breathe.

Layer One

Before you start planting your terrarium its a good idea to give the inside a good wash (can't be doing this once your plants are in). For the base layer (Image 1) of our terrariums we put in equal amounts of activated charcoal and gravel. As there are no drainage holes in a terrarium, this acts as a 'reserve' for the water and prevents the plants from staying too wet. The amount you use will be determined by the size of your vessel. For this example above layer one was around three centimetres deep.  

Layer Two

The next bit involves creating a layer of protective and absorbent sphagnum moss, to form a barrier between the gravel and the soil to ensure drainage levels remain optimal (Image 2). Insert a dense layer of sphagnum moss on top of your gravel and press it down (I used a metal skewer for this hard-to-reach into bottle) to ensure that the soil won't mix into the gravel underneath. 

Layer Three

The final layer of your terrarium (Image 3) is soil. Choose one suited to your plant. Mine was a relatively dense mix to keep the humidity high and my fern and moss happy (think forest floor soil), where a succulent may prefer a sandy soil medium (ask the folk at your local garden centre when you purchase plants if you are unsure). 

Layer Four

Finally the fun part (Image 4), planting your terrarium! To place plants in a bottle I used a long handled set of tweezers, but you will tailor your planting to suit your vessel (I have seen a video on large bottle terrariums where the maker has used coat hanger wire to make a planting implement). I really enjoyed planting my fern and arranging the moss around it, so much so that I went on to make another succulent terrarium and a mini 'mug-o-terrarium' (which looks pretty funny at the moment but will look good when my succulent grows a little larger). 

Placement and Care

Glass magnifies the suns rays (think mean boys burning ants with magnifying glasses), so be sure to take this into account when placing your terrarium. They prefer indirect light to sunlight or darkness, and a nice comfortable consistent temperature. So a coffee table out or bench out of the sun is a great location. You will need to keep an eye on your plant for watering times (check the care ticket that comes with your plant on purchase for guidelines) but you can generally see when its time to water. A mossy/ferny terrarium should always maintain a bit of moisture and humidity, while a succulent/cacti terrarium will remain quite dry. It is easier to visually tell when a humid terrarium is dry due to an absence of dew droplets, but a cacti/succulent isn't as easy to tell so a general rule is a one a month water (again depending on what your care tag indicates). 


Tuesday, March 4, 2014

The Smallest Room


A separate toilet is a blessing in a three bedroom one bathroom house. For my man and I one bathroom is no problem. However, for resale this can be a huge disadvantage. Most families look for houses with two or more bathrooms to save all the arguments when getting ready in the morning. So having a separate toilet can assist in the traffic direction for larger families.

I have been looking EVERYWHERE for toilet decoration inspiration and have come up with nothing. So rather than looking for room inspiration I have started imaginary shopping instead. I have decided we will need to invest in this fantastic water saving toilet with a sink over the cistern. This will make our toilet a 'power room' as it will all be self contained.

Kyle and Karas amazing bathroom on the block this week gone has inspired me to rip up the tiles and work with the wooden floor for warmth and tile the wall (probably with a slate grey tile) behind the toilet as a feature. With the right lighting (which I haven't worked out yet) the room will be a fantastic self contained powder room and a feature (which sadly it has to be as it is at the end of the hall and people will see it).

Monday, March 3, 2014

The First Impression


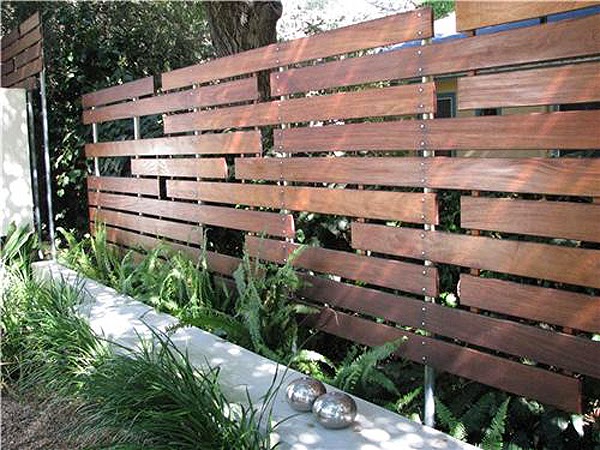
I found it difficult to find internet inspiration for fence design. It is actually easier to take the dog for a walk and look for inspiration on the street. Perhaps that indicates that the best design for your area usually lyes in your own backyard, not on the net. I love the use of recycled timber and corrugated iron in fencing. My man wants to incorporate some vertical gardens onto the exterior of our fence to give it a living feature.

Sources: apwarts, houzzwoodsolutionsinnovativelandscapetechnologiesmodesthomeplanworldofarchitecture

Sunday, March 2, 2014

Terrarium Inspiration


The coffee table is awaiting a perspex top. As soon as it is complete I plan to create a terrarium centrepiece using some lab bottles I have purchased. These were some of the ideas that have inspired me. There is something truly magic about growing plants under glass, and even though it's what I do all day at work, I still want to play with them in my spare time!


Sources: Doodle Bird, Celiabedilia, inhabitantpeerflixsplendid designsaltlakemagazine

Monday, February 24, 2014

Bedside Table DIY Results


So this is the result of a few hours of sanding, polishing, and screwing some wheels onto part of our old desk set up. The original crate was a deep mahogany stain so it required some serious sanding. I think it really suits its use as a bedside table as opposed to a storage cube on a desk. Now all I have to do is paint the bedroom (get rid of that awful pink and purple) so it can be used to its full advantage.

Sunday, February 23, 2014

One Hour DIY


DIY projects often seem completely unattainable if you are on a tight timeframe. Fortunately I am one of the lucky ones with plenty of time to spare (thanks to a well paying part time position). However, there are times when I just want to create in a hurry. This morning I decided I need a comfy place on the deck to read my books. We currently have two deck lounging options, one is a fold up camp chair, the other is a disgusting couch that came free with our house, which the dog has claimed for his own. So a quick and easy DIY was in order.

I bought an outdoor cushion two years ago with intentions of making furniture to go underneath it. Fortunately for me this cushion happened to be half the size of an old pallet that again, had come free with our house. You can pick these kinds of pallets up from pretty much any store, rubbish dump, or building supplies place, usually for free.

I used a hand saw to cut lengthwise down the middle of my pallet. Once your pallet is in two sections give it a bit of a tidy up to make sue when you stack one half on top of the other that you have a neat clean match up. I had to saw three sections off mine to make the whole thing roughly match. The finish of your final product will determine the amount of effort you put into sanding. I used an electric hand sander with a rough grit (40) to give my pallets a quick clean up. This is earmarked as outdoor furniture and I was not worried about the finish as we are likely to take it all apart and use the wheels etc, to make different furniture when we do our deck renovation. If you want a forever piece its worth putting in the extra effort and giving the whole thing a course, then fine sand.

Next up I used a white gloss enamel to give the pallet a 'white washed' finish. If you were after a really high sheen I would recommend using an undercoat (the wood on these is really absorbent), then applying a couple of coats of paint. Once these are dry lay one half of your pallet on top of the other and secure together with flat brackets, using a drill and some screws. I screwed castors to the bottom of my pallets to make it easy to manoeuvre on the deck.

In under an hours with of effort (sandwich break or two in the middle while the paint dries) you have yourself a comfy rustic looking perch.


Sunday, February 16, 2014

Pallet Perfection


My man and I are nearly finished our coffee table project. Once we have varnished it I will do a post on the construction and finished product. These images are a collection of my inspiration for the project. Our table looks a little different to all of the above, which is the beautiful thing about working with reclaimed wood, each piece has its own say in how it would like to be used.

Sources: etsy, palletfurniture, thepoorsophisticate, vintageindustrialfurniture, houzz